Thursday, September 17, 2009

Aerodinamics - spoiler


A spoiler is an aerodynamic device attached to an automobile to decrease lift, decrease drag, or increase the amount of force pushing the vehicle's tires to the road surface (also called downforce). Spoilers are often fitted to race and high-performance sports cars, although they have become common on passenger vehicles, as well. Some spoilers are added to cars primarily for styling purposes and have either little aerodynamic benefit or even make the aerodynamics worse.

Spoilers generally work by disrupting the airflow going over a car. This disruption has two primary effects:

1. reducing the amount of lift naturally generated by the shape of the car, and

2. increasing the amount of positive pressure downward through the vehicle

The result of these two effects is the same: increasing the force between the tire and the road surface, thereby increasing traction. This increase in traction allows a vehicle in motion to brake, turn, and accelerate more aggressively without tire slippage. Additionally, this is accompanied by an increase in aerodynamic drag.

In nearly all cases, downforce and drag increase as the speed of the vehicle increases. Thus, spoilers that are effective at very low speeds often generate excessive drag at high speeds, and spoilers that work well at high speeds are often ineffective while moving slowly. Some spoilers have adjustable components so they can be tuned. Formula One cars, for instance, feature different settings so the car can be optimized for short, low-speed tracks or larger, high-speed ones!

Types of spoilers

Although the most recognizable spoiler is the wing spoiler, there are actually many different types of spoilers.

* A wing spoiler is an airfoil is suspended above the body of the vehicle.

* A lid spoiler (commonly trunk lid spoiler, lip spoiler, or boot lid spoiler) is often a ridge of plastic or metal attached directly to the top of the trunk lid.

* A roof spoiler is a small ridge of plastic or metal attached to the very back of the roof, usually just above the rear window.

* A splitter is a spoiler attached to the front bumper, very close to the road surface, sometimes known as a "front spoiler" or on stock or stock-appearing cars as an "air dam."

Racing

Spoilers are used extensively in automotive racing. Top Fuel drag racing cars feature massive spoilers on the back, whereas F1 cars feature spoilers on both the front and back of the vehicle. Rally cars are often equipped with smaller spoilers, similar to those seen on modern sports cars. Sprint cars have very large asymmetric spoilers designed for the comparatively low speeds seen at a sprint track. NASCAR stock cars have small roof and lid spoilers.

Sunday, August 30, 2009

General engine tuning tips


Engine Tuning an overview.
Engine tuning depends largely on the base engine size and to a large degree depends on the amount of tuning done at the factory. The larger the engine the larger the gains will be. Each type of engine have different characteristics for example the Honda VTEC is very high revving wheras a large v8 lump provides power in a very lazy manner at low revs, adding turbos or superchargers further alter the characteristics of the engine and some modifications will actually cause a loss of power if applied to the wrong engine typre. Here is a very very brief overview of engine tuning strategies for the various types of engines out there. Please join us in the Chat forum for detailed questions and tuning tips for your specific car type.

Smaller engines under 1.4l

These are relatively solid and can withstand a fairly good redline usually higher than some of the larger capacity engines. As these engines do not produce much power there is not much of a gain to be had from them. Adding an induction kit and exhaust will make the car harder to live with. A fast road cam that exploits the high revving nature of these engines is probably the best thing you can do. It is also worth increasing the fuel by getting larger injectors. (Often models in the same range with larger engines have compatible injectors so see if the injectors from the 1600cc will fit your 1300cc engine.)

Mid size engines
1.4-1.8l This is actually a very wide band of engine types and sizes. The base upon which to build is greater so there is more of a reward from tuning them. I would recommend a sports exhaust particularly on the higher revving Japanese engines. I would still hesitate to add an induction kit but a panel filter which is a direct replacement for the standard paper air filter is a good compromise. Towards the upper engine sizes of this range you will start to see gains from the addition of forced air induction either a turbo or supercharger. Because you are adding pressure with forced air induction you should seek to reduce the compression ratio of the engine and run at a relatively low boost level. Addition of Nitrous Oxide injection can also yield some silly power gains. Fast road cams will have a good effect too but not in isolation - to free up the power generated by the cam you will need the sports exhaust and a better flowing air filter.

Larger Engines
2.0 upwards including V6 V8 etc.
These are the big daddies. The tend to provide much more low down torque than the smaller engines and all have good tuning potential. Inductions kits generally work quite well as do sports exhausts of 2.5-3inches in bore diameter. The larger the engine the more you have to gain by adding a sport computer or reprogrammed ecu. Due to the nature of these big engines I would not recommend a turbo application due to the internal engine modifications that would need to be applied, but mild supercharging is still beneficial. CAMS would also have a good impact on the performance of these engines, especially the silky smooth V blocks, but as the gains are much bigger than with the smaller engines fuel uprating becomes vital or you run the problems of running too lean. Temperature control is vital as the larger cylinders produce and hold a lot of heat. Ensure your cooling system is up to spec and use water wetter to raise the boiling point of the coolant. Overheating can be a major cause of engine failure.

Diesel Engines
Diesel engines run differently to petrol engines in that the compression within the cylinder causes the fuel and air to burn as the pressure increases. The big problem with diesel engines is that they have very high compression ratio's and the fuel does not burn as quickly as petrol engines so typically the engines have much lower redlines. This is why many performance diesels come with a 6 speed gearbox with low ratios to cope with the relatively short power band. Manufacturers have experimented with prewarming the diesel before it goes into the engine and various methods of direct injection so it is actually quite hard to give general tuning advice. With nearly all Turbo Diesel engines there are quite silly power gains to be had with a remapped ECU - or the addition of a piggy back ecu which takes over much of the timing calculations. 'Chipped' diesels are still very economical and users have reported that they are much more free revving and easier to live with. Servicing is vital though to keep the engine running at peak efficiency as a chipped engine is quite unforgiving.

Turbo Engines
The largest power gains to be had are on vehicles equipped with a turbo. A straight remap of the ECU yields a lot of extra power sometimes as much as another 25-30%. Turbo engines have to cope with a lot of stress so most leave the factory in a very strong state. Uprating the turbo with either a larger turbo or twin turbo set up can help improve power even further but with this route all other aspects of tuning should be explored to release the full power available (Sports exhaust including flowed down pipe, induction kit with a cold air feed, larger valves and flowed head, bigger injectors and a larger more powerful fuel pump, strengthened bottom end of the engine if you are increasing the power by more than 50% of its standard spec).
It is worth remembering that whenever you increase the amount of fuel you need to balance this with air. The ratio must be fastidiously maintained otherwise the car will run rich if there is too much fuel or lean if there is too much air. Most engines a self adjusting but attention must be given to fuelling and air induction when pushing the tuning potential of the engine to it's limits.
All cars respond well to weight reduction - please see the article on weight reduction for more detailed discussion of this releatively cheap method of increasing your cars performance.
Most modern engines have a complex engine timing and management computer and most can be retuned to a higher state of tune fairly easily but this is best done after other modifications are carried out. Piggyback computers offer adjustments where standard ecu programming is not available.

Chip Tuning


Modern engine computers (ECU's) take over many of the controls of all aspects of engine management from timing to fuelling and more.

This actually means you get better power, a cleaner burn and more reliable engine but it does not mean the end of tuning.

Chip tuning is a term used very loosly to describe any process of remapping the cars engine.

The term probably stems from the early days were chips could not easily be reflashed and updated.

The only option in these cases was to replace the chip. Often these would need to be soldered and could be quite fiddly and, due to the delicate nature of chips, prone to failure.

EPROMS which were erasable and programmable chips could be removed reflashed and reinserted into the car.

In recent times we have seen cars equipped with on board diagnostic ports that allow a fresh map to be uploaded.

Is chip tuning something you can easily do yourself? Not really, you need to have detailed knowledge of the engine and ideally a full set of diagnostic equipment on a rolling road to allow you to make "live" adjustments to the mapping. There is certainly a lot more to it than just changing a few numbers and getting a big power gain.

With DIY chip tuning you also run the risk of a bad flash where the computer cannot be recovered and without a restoration image you will need to visit the main dealer or worse still buy a new computer.

The best form of chip tuning is where a custom map can be inserted that takes into account your cars strengths and weaknesses and any other modifications that you have had done. There are still a few companies out there offering replacement chips set to a more sporty setting.

This is not to be confused with piggy back chips or plug in boxes. These are only useful in cases where a reflash or replacement chip is not available and it would still be better to buy a whole aftermarket ECU and use this.

We are often asked if chip tuning works on all engines. Generally speaking any car will see a benefit but the larger gains are from turbocharged applications. In a NASP (Naturally Aspirated) engine power gains are around 10-20%, but in a turbo engine the power gains are typically around 40% for a petrol and 30% for a turbo diesel.

Even a car getting a relatively low power gain from a remap will actually be more lively to drive. The peak power gain figure is only a very small part of the equation. The engines response under acceleration and its torque curve are the primary reasons for getting into chip tuning.

The downsides of chip tuning are the need for more regular car maintenance and servicing. You are effectively reducing the safe margin of error the makers build in. This compensates for low quality fuel, or the wear and tear associated with longer service intervals.

Monday, August 24, 2009

Custom Gauge

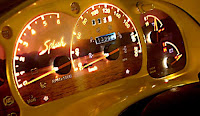
Installing custom made gauges like these on your car is easy! Not only will it give your car a unique look, you can change them whenever you like and create as many template variations as you wish.

The only things needed are pictures, background images, paper, and Adobe Photoshop.
At the same time installing the new templates you could also change the back lighting for your factory gauges. It is fairly simple to do and gives your vehicle a unique look!


Installation Instructions:
Step 1 - Open your dash and expose the gauges.

Step 2 - Once you've completed this step, scan them at a minimum of 300dpi in a Photoshop compatible program.

Step 3 - You will need to separate the image and have the background (figure 1) on one layer and the numbers and "dummy lights" on the other (figure 2). You can customize the second layer to your specifications, eg. font, size, angles, outlines....etc. Both layers need to be transparent.

Figure 1

Figure 2

Step 4 - The background layer can be replaced with whatever image fancies you. I've chosen a sunset. Create a new layer and paste the desired image. Select "transform" to stretch the image to full size. Ctrl + left-click on the background layer to automatically "lasso" the outline of the gauges. (Figure 3, layer 18). Once you've selected the outline click Ctrl + Shift + I to reverse the selection then Crtl + X to cut. (Figure 4)
Figure 3
Figure 4

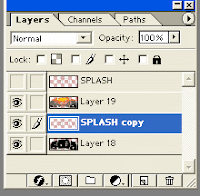
Step 5 - To make a copy of the "dummy" lights and numbers layer, click on the layer from the "layers window" then press on ALT + L and choose "duplicate layer". Move the copied layer between the black and pictured gauges. (Figure 5)
Figure 5

Step 6 - Merge the first two layers.

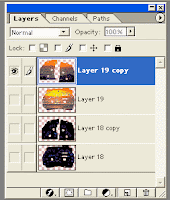
Step 7 - To select the shine-through colour at night, click your "dummy lights" in the layer window and Ctrl + Left click to select. On the black gauges layer, use the "bucket" to fill in desired colour to shine through. Trash the copy layer. (Figure 6)

Figure 6

Step 8 - Make a copy of each layer.

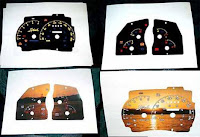
Step 9 - Make the image fit on a standard page. (Figure 7)

Figure 7
Step 10 - Print each layer on regular white paper. (Figure 8) (Warning: with regular white paper, some light will shine through parts you don't want light to shine through. You get used to it though)

Figure 8

Step 11 - Cut out the images and glue the black behind the coloured. Align using a bright light behind them. Use ordinary wood glue and press in a heavy book overnight.

Step 12 - Reverse step 1 to install back into vehicle.


Thursday, August 13, 2009

DIY ANGEL EYES HEADLIGHTS

'Angel Eye' is a cool headlight feature found on the new (2001+) BMW 5 Series. The projector headlamp unit on the BMW 5 series has a pair of circular-shape rings that when light up, they produce a pair of halos. BMW calls them 'Angel Eyes'.Creating Angel Eye Rings
Instead of a round glass rod used by BMW, I used a clear acrylic/plastic rod.The rod is actually made for your window blind to open/close the blind when you turn it left/right.It is about 50 cm long with a diameter of 8mm, and you can create 2 angel rings out of it. The rod has a hex-shape structure, not a round shape like the BMW, but it will do just fine because this reflects more light.
Додај слику

he first thing I did was to create a circular ring out of it. I measured the diameter of my high-beam projector housing, which comes out to be 4" (or 2" radius). Usingthe circular formula (C=2'pi'r, where pi=3.14), you'll have to cut your rod about 12.5 inches long. I suggest cutting it 15" long, and use the extra inches as handles to help in the molding process.

Next, I find an aluminum can or jar that has about the same diameter as the ring (I used a peanut jar). After heating the rod in a small toaster oven for about 5-7 minutes at 300°F, I held the two ends of the now flexible rod with a pair of pliers, and wrapped them around the peanut jar with one end crossing over the other end.

For better control, you can wear your winter gloves or use your socks. The flexible rod will harden within a minute. So, you may have to repeat this step 1 more time to mold it into a perfect circular ring.

Once done, you can use a Dremel tool to cut the extra handles that were used during the molding process. You will end up with one end above the other, as shown.

Don't worry; later when you wrap electrical tape around the rod to hide the LED bulbs, the two open ends will realign themselves. If you like to be perfect, you can simply put it back in the oven one last time and allow the ends to soften and flatten.

Making The Eagle Ring Light Up

In order to make it lights up like the true 'Angel Eye', I had to refract the light as it goes through the rod by making multiple cuts (scratches) along the rod, using a Dremel tool. Each cut/groove allows the light to 'escape' the ring. Each cut is about 2~3mm apart. Don't make the cuts too close to one another. This will make your ring look like a continuous band of light, like those glow-in-dark flexible toys. In my opinion, the ring look better and more sophisticated with the cuts evenly space out.

It will take about 2 minute to do the cuts using a Dremel tool. If you don't have a Dremel tool, you can use a small saw or a butter knife, but will take you longer. A Dremel tool set would cost about $30. It has many uses, such as cutting, sanding, carving, buffing, etc. Good tool to have for hobbies.

Hint: To get the cuts look perfect, you can do the cuts ahead of time before making a circular ring out of it. You only need to make the cuts along 1 of the 6-sided rod.

Doing 2 or more sides will make your ring look dimmer, because most of it has 'escaped' before it reaches the other end of the rod. Also, let the cut side be the backside. When you turn it over to the front, the hex shape, which acts like mirrors, will multiply the cuts and the cuts are brighter too. The light appears to be refracted inward (take a look at the pictures below on the right to see what I mean).


With a Dremal tool, you can
create the cuts in 2 minutes.


LED Light For ANGEL EYES

LED bulbs are very efficient, last very long (no filament to burn out), and produce very little heat. The LED bulb along with the resistor use less than 1W of power, compare to a 35W halogen bulb used in the real BMW angel eyes. LED bulbs are bright too even though they are only 1 mcd.


Angel Eye with blue LED.


They cost from around $3 to $4 each at your local Radio Shack store. Note that LED bulbs are not like halogen bulbs where you can just connect positive and negative wires to them to light them up. You must use a resistor. The purpose of the resistor is to limit/resist high current going through the LED bulbs. LED bulbs require only a small amount of current to light up. Hence they are very efficient. Resistors should cost about $1 for a set of 5 at a local store like Radio Shack. Very cheap!

Resistance is measured in ohms. To get the correct resistor for your LED, use this modified version of Ohm's Law:

Ohms = ( V.bat - V.led ) / Amp.led. where V.bat = voltage of battery, V.led = voltage of LED, Amp.led = Amp of LED

When you buy the LED bulb, it will tell you the voltage and amp used. Just plug them into the equation to get the Ohms value. In my case, I have a 12V battery and a 3.6V LED with 20mA (or .02A). So, I used a resistor of 420 ohms [(12V - 3.6V)/.02A]

You can use a lower ohms resistor, eg 220 ohms, to light up your LED. In fact, it will make your LED brighter because low resistance allows more current to go through the bulb. I have been doing this for 3 months now and still haven’t had any problems.

Also, you must attach the resistor to the positive terminal of LED bulb, which is the longer of the 2 terminal legs. I suggest that you attach a wire to the LED bulb first, and then attached a resistor at the end of the wire on the positive terminal. This will give you flexibility because the resistor will be outside your headlight unit and you can change it if you have a need to do so later, like changing to a lower resistor to make your Angel Eye brighter.


Resistor connected to positive lead,
which is the longer one.


Securing LED Bulbs Inside ANGEL EYE Rings

To secure the LED bulbs into my Eagle Eye rings, I drilled a hole in both ends of the ring, about 6mm wide and 5mm deep. I used two white LED bulbs and parallel

paired them together. After soldering a foot-long wires to the positive and negative legs of the LED bulbs, I wrapped black electrical tape around the legs to keep them

apart. I will attach the resistor to the end of the wire later when I connect the wire to my parking light.

Next, I inserted the bulbs inside the holes of the ring, and wrapped black electric tape around it to hide to LED bulbs. This will also hold the bulbs and the two ends of

the rod in place. DO NOT paint the rod black. For some reason, the black paint will absorb the light and will make your angel ring look dim. If you plan to wrap the black

tape around the uncut/unused part of the ring, make sure you wrap some aluminum foil around them first before wrapping the black tape. The aluminum foil will reflect.


LED bulbs inside ring.


Taking Apart Projector Headlight

Next, it was time for me to put them into my HID projector headlight unit. First, I had to open apart my headlight unit. This is done by heating it in a cooking oven for about 10-15 minutes at 275°F or until the glue loosens. It may take a longer or shorter time to soften the glue on different headlamp units. Remove any attachments, like your bulb or wire harness, that may not be able to withstand the heat. Be very careful when separating your projector unit because the glue will stick to anything it can get a hold of. Think of hot melted cheese on a slice of pizza when you pull it apart.

My aftermarket projector headlight is divided into 3 components, a reflective housing, an internal black frame, and a clear front cover. I glued my angel rings to the black frame, using clear silicon adhesive or Crazy/Super glue. I applied only a very small amount of glue to the un-scratch/un-cut part of the ring. The inner black frame acts as a barrier and helps protect my angel eyes from the heat coming from the reflective housing.

Putting the Headlight Back Together

ext, it was time for me to re-attach the front cover back onto the headlight unit, using the same glue. Just reheat them in the oven until the glue softens again. Very important, I only had to heat the reflective housing and the front cover. You don't need to reheat the black internal frame. Plus, the angel rings on your black frame may deform.

Once the glue is softening again, I took out the reflective housing and the clear front cover. I put the black frame with the angel rings back onto the reflective housing.

Then I ran the wire from the angel ring through the water drainage opening of the housing. Now, I put the clear front cover back onto the headlight housing. Remember to apply pressure to get an airtight hold. I had to sit on it to get this done. I also used clamps to make a tight seal. Finally, I put the headlight unit back onto my car. With a 220 ohms resistor attached to the positive terminal of the LED wire, I made a parallel connection to my parking lights. You can connect it to anything, an external light switch, high beam, running light, etc.

by: RobinHooD

DIY ANGEL EYES HEADLIGHTS